24/7 Emergency Service | Licensed & Insured | Upfront Pricing.
 Call Now: (305) 507-45-57
24/7 Emergency Service | Licensed & Insured | Upfront Pricing.
Call Now: (305) 507-45-57


In over 15 years of plumbing across Miami, our team has walked into hundreds of bathrooms that looked more like indoor swimming pools than functional washrooms. Most of those disasters could have been avoided with two things: a cool head and the right technique. If you are staring at a rising water line right now, do not panic.
We handle clogs on the job using a specific hierarchy of action, starting with the five-second emergency save and moving to tools that actually work.
If you just flushed and the water is climbing toward the rim, you have a very short window to act. Forget the plunger for a moment—save your flooring first. Every inch of water on your tile or laminate is a step toward a $3,000 restoration bill.
1. Kill the Water: Reach behind the base of the toilet for the silver handle (the shut-off valve). Turn it clockwise until it tightens completely.
2. Open the Tank: Lift the heavy ceramic lid off the top and set it somewhere safe. Do not put it on the tile; it is fragile and will chip or crack.
3. Manual Override: Look for the rubber circle at the bottom (the flapper). If it is open, push it down with your hand to seal the tank and stop the flow into the bowl.
4. Hold the Float: Grab the floating ball or cylinder and hold it up. This tells the fill valve to stop refilling the tank.

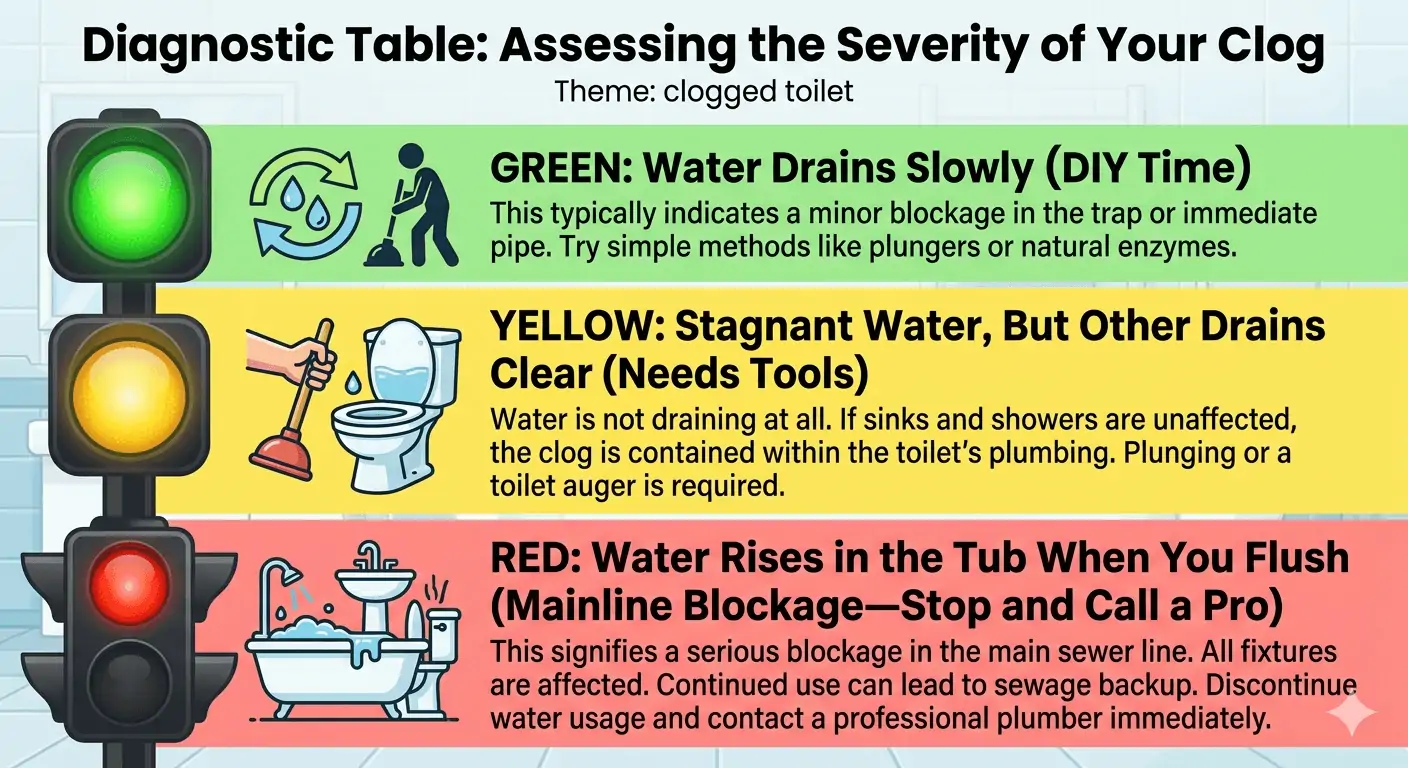
Before the sweat starts dripping, you need to know if this is a job for a homeowner or a master plumber. On jobs from Coral Gables to Hialeah, we always check the "canary in the coal mine" first: the bathtub.
The Quick Path Algorithm:
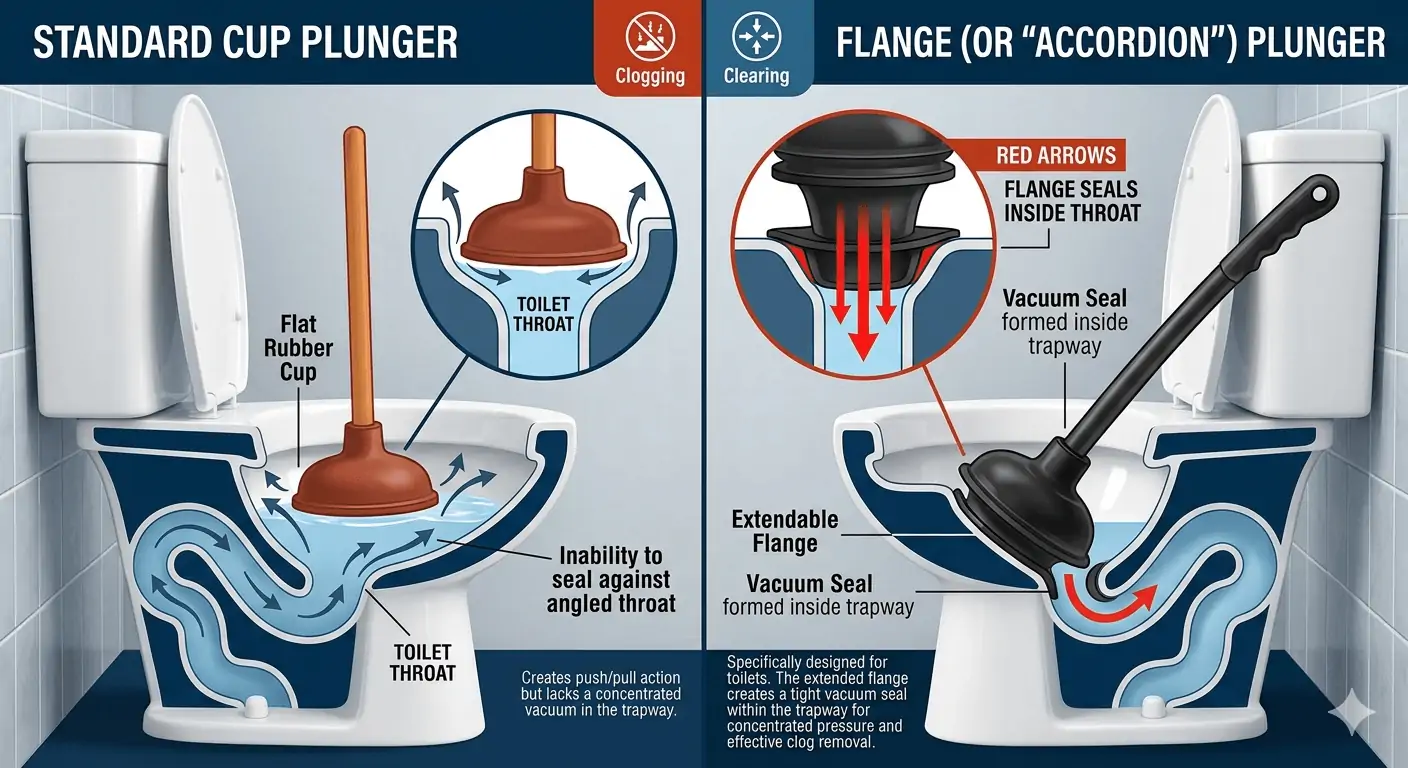
Most homeowners own the wrong tool. Those red, cup-shaped plungers are designed for flat sinks. For a toilet, you must use a flange plunger—it has an extra rubber sleeve tucked inside the bottom specifically to fit the toilet's throat.
1. The Seal is Everything: Pop that extra sleeve out and fit it directly into the drain hole. You need an airtight vacuum.
2. Burp the Air: Push down slowly once to force the air out of the plunger bell. If you skip this, you are just compressing air instead of moving water.
3. The Rhythm: Once you have a seal, give it 10-15 vigorous up-and-down strokes. The "up" pull is just as vital as the "down" push because it loosens the debris. Repeat this for up to three rounds before trying another method.
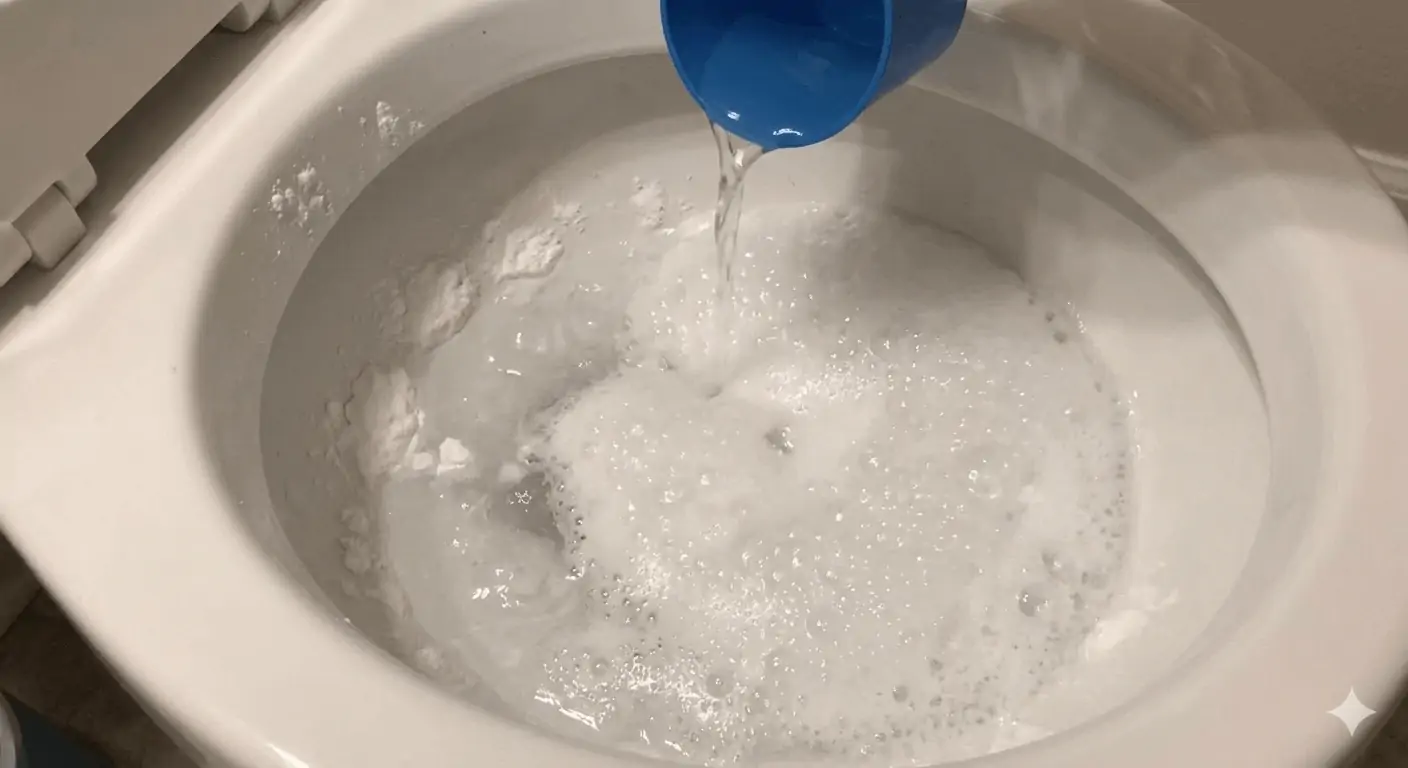
If you do not have a plunger, you can let physics and lubrication do the heavy lifting. This is best for "organic" clogs, such as an excess of toilet paper.
1. Squirt about 1/2 to 1 cup (120-240 ml) of liquid dish soap into the bowl [1], [3].
2. Wait. Give it at least 15 minutes for minor issues, or an hour for tougher blockages [2], [5]. The soap acts as a lubricant to help the waste slide through the P-trap (the curved internal pipe that holds water to block sewer gases).
3. Add hot water—but never boiling water. Aim for about 110°F (43°C), roughly the temperature of a very hot shower [5]. Pour it from waist height to create gentle pressure.
1. Pour 1 cup of baking soda into the bowl, followed by 2 cups of white vinegar.
2. Let it fizz for 30 minutes. This chemical reaction helps break down the structure of the clog so it can be flushed away.
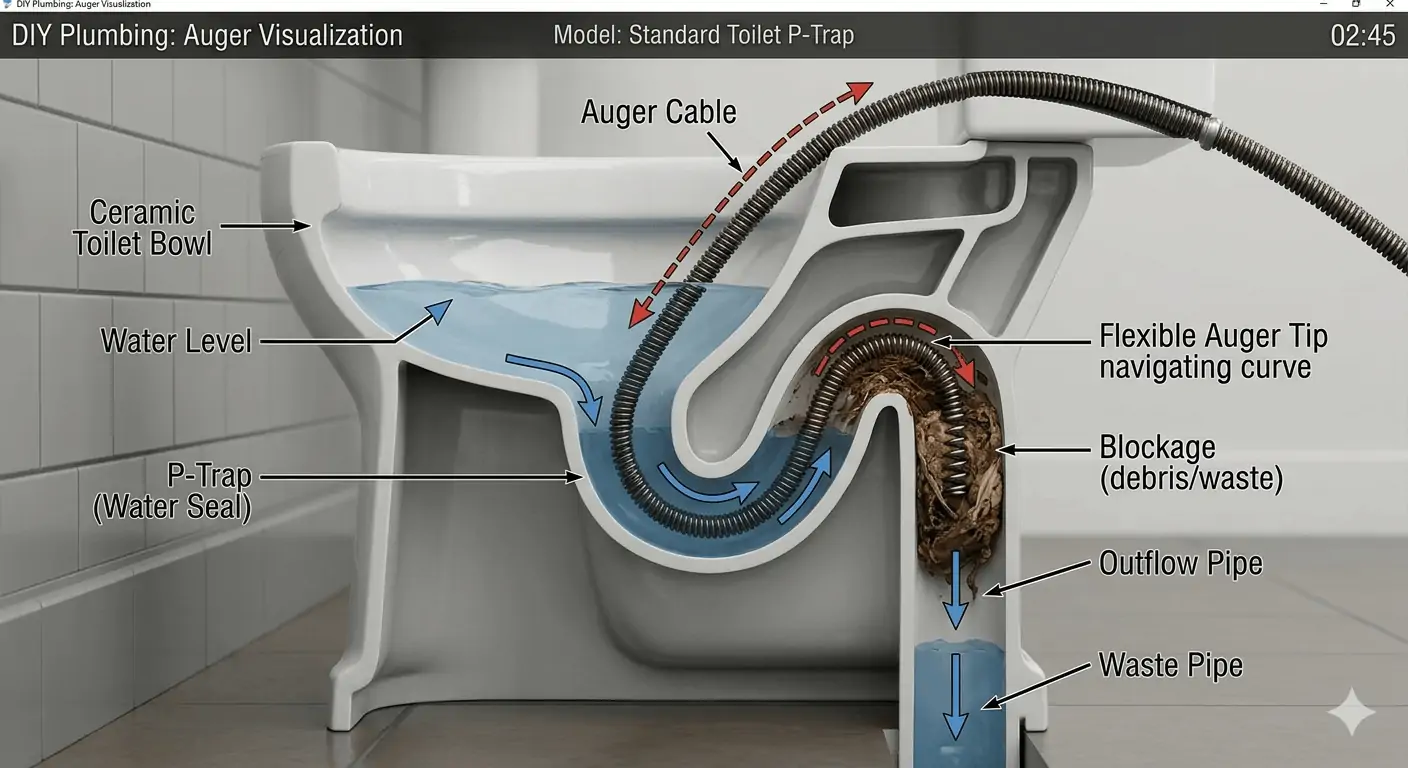
When the plunger fails, we move to the "closet auger." This is a flexible steel cable inside a protective metal tube designed to navigate the toilet's internal curves without scratching the porcelain [4].
1. Protect the Porcelain: Ensure the plastic guard at the bottom of the auger is seated firmly in the drain.
2. Crank and Push: Rotate the handle clockwise as you push the cable in.
3. Don't Force It: If you hit a solid obstruction, do not use excessive force. Give it two solid attempts [1], [4]. If it will not budge, a hard object like a toy or a cell phone is likely lodged inside.
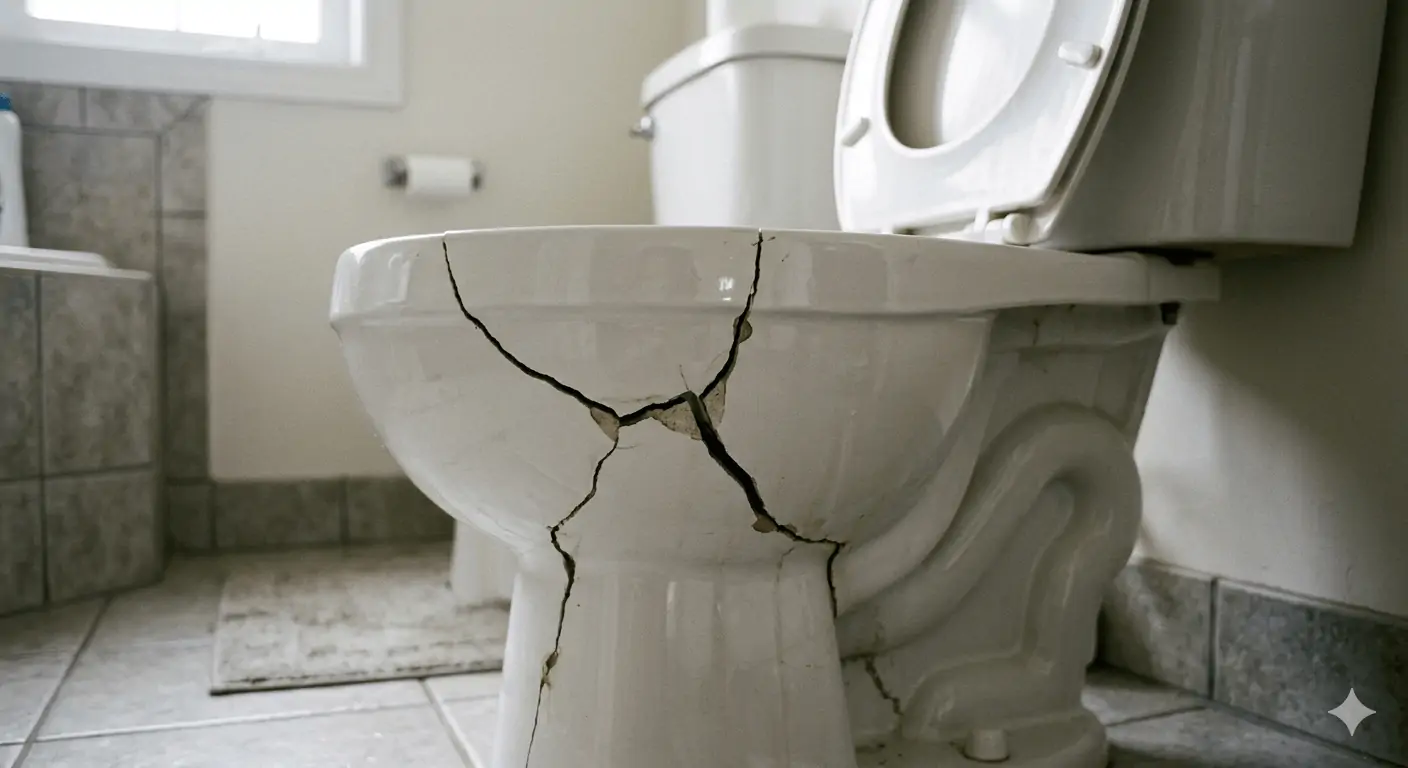
We have seen "simple" clogs turn into total bathroom remodels because of three specific errors. In South Florida, where humidity and mold are constant threats, these mistakes are catastrophic.
Plumbing issues do not resolve themselves. While a professional visit for a clog averages $315 [8], letting an overflow sit can result in thousands of dollars in mold remediation and structural floor damage. Beyond the property damage, the real risk involves the chemical burns our service teams face when homeowners use heavy acids before calling for help [6]. If the "home chemistry" methods do not work within an hour, the problem is mechanical and requires a professional touch.
To keep our team out of your bathroom, follow the "Three P's" rule: Only Pee, Poop, and Paper (toilet paper) should go down the drain. "Flushable" wipes are a marketing myth—they do not break down and are a leading cause of sewer backups in Miami.
We know that a clogged toilet feels like a crisis, especially when you have a busy household to run. But remember: if you can't clear it with a plunger or the soap method in the first twenty minutes, you aren't "failing"—you've simply found a problem that requires professional tools. Take a breath, keep the water shut off, and give us a call. We've seen it all before, and we'll get your home back to normal without the stress of a flooded floor.
[1] Ace Plumbing: Professional Unclogging Standards by Justin Cornforth — https://aceplumbing.com
[2] L'AVANT Collective: Dish Soap and Paper Degradation Timelines — https://lavantcollective.com
[3] Tom Plumber: Dish Soap Method and Ratios — https://www.youtube.com/c/TomPlumber
[4] Kohler Official: Toilet Maintenance and Auger Protocols — https://kohler.com.vn
[5] PHCP Pros: Water Temperature Codes (ASSE 1070) — https://www.phcppros.com
[6] Mr. Rooter: Chemical Hazards for Service Professionals — https://www.mrrooter.com
[7] Oatey: Plumbing Emergencies and Pipe Integrity — https://www.oatey.com
[8] Today's Homeowner: Plumbing Costs 2024 Report — https://todayshomeowner.com
[9] EPA: Clean Water Act Compliance Guidelines — https://www.epa.gov

 Verified by Carlos Rivera