24/7 Emergency Service | Licensed & Insured | Upfront Pricing.
 Call Now: (305) 507-45-57
24/7 Emergency Service | Licensed & Insured | Upfront Pricing.
Call Now: (305) 507-45-57


In fifteen years of servicing Miami’s commercial kitchens, our team has seen two types of restaurant owners: those who treat their grease trap like a vital organ, and those who treat it like an afterthought—until the floor drains start backing up during a Friday night rush.
A grease trap isn't just a box under the sink; it’s your business’s primary defense against city inspectors and massive repair bills. Whether you are setting up a new kitchen or replacing an old unit, you need to know where the DIY path ends and where the heavy-duty professional work begins.
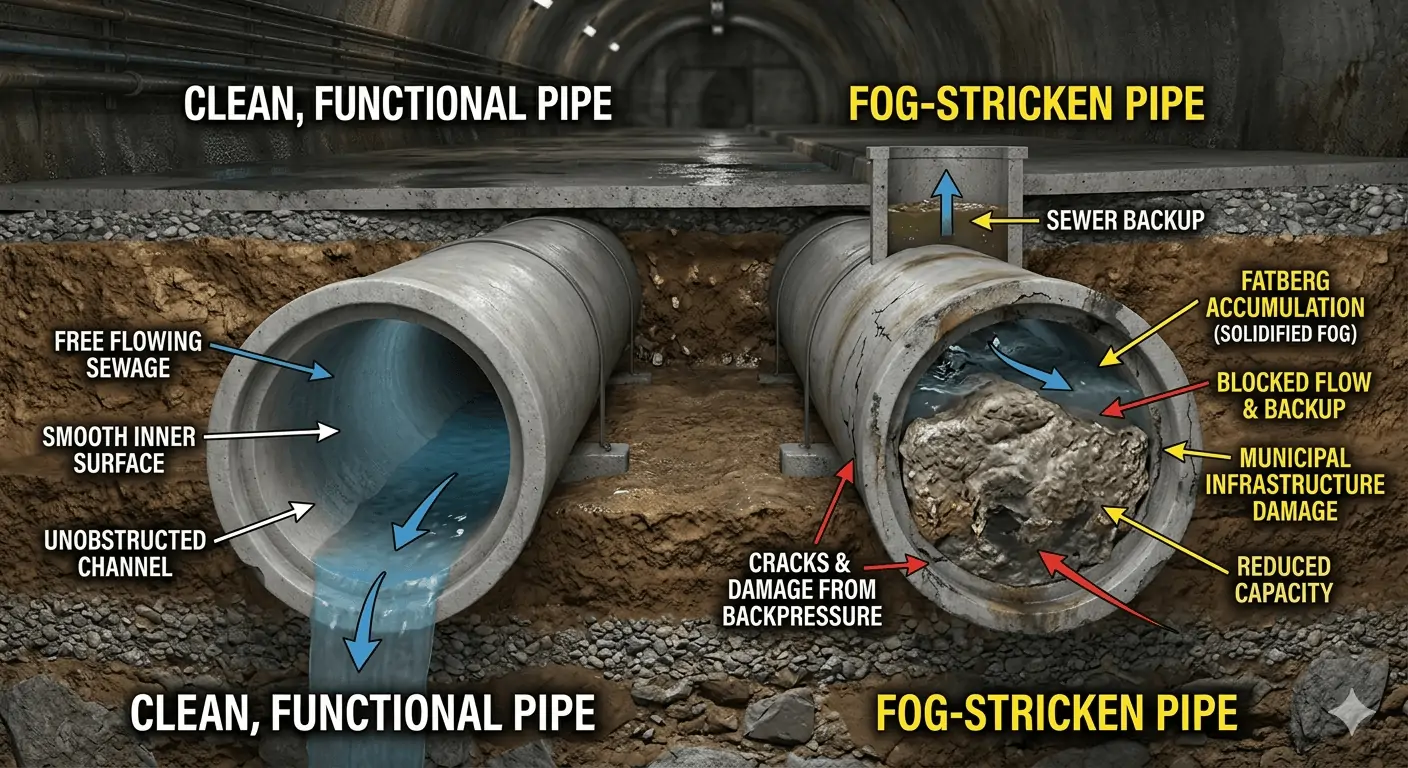
Think of a grease trap (or interceptor) as a filter for your drainage system. It catches FOG—fats, oils, and grease—before they hit the city sewer lines.
When hot grease goes down the drain, it looks harmless. But as it cools, it solidifies into "fatbergs" (massive blocks of congealed fat) that choke your pipes. This is why the EPA and local Miami codes are so strict: they don't want your kitchen's waste shutting down the whole block's sewage system.
Not every business needs one. If you're running a small boutique or a cafe that doesn't use espresso machines or cook hot food, you might be exempt [7]. But for full-service restaurants, it's mandatory.
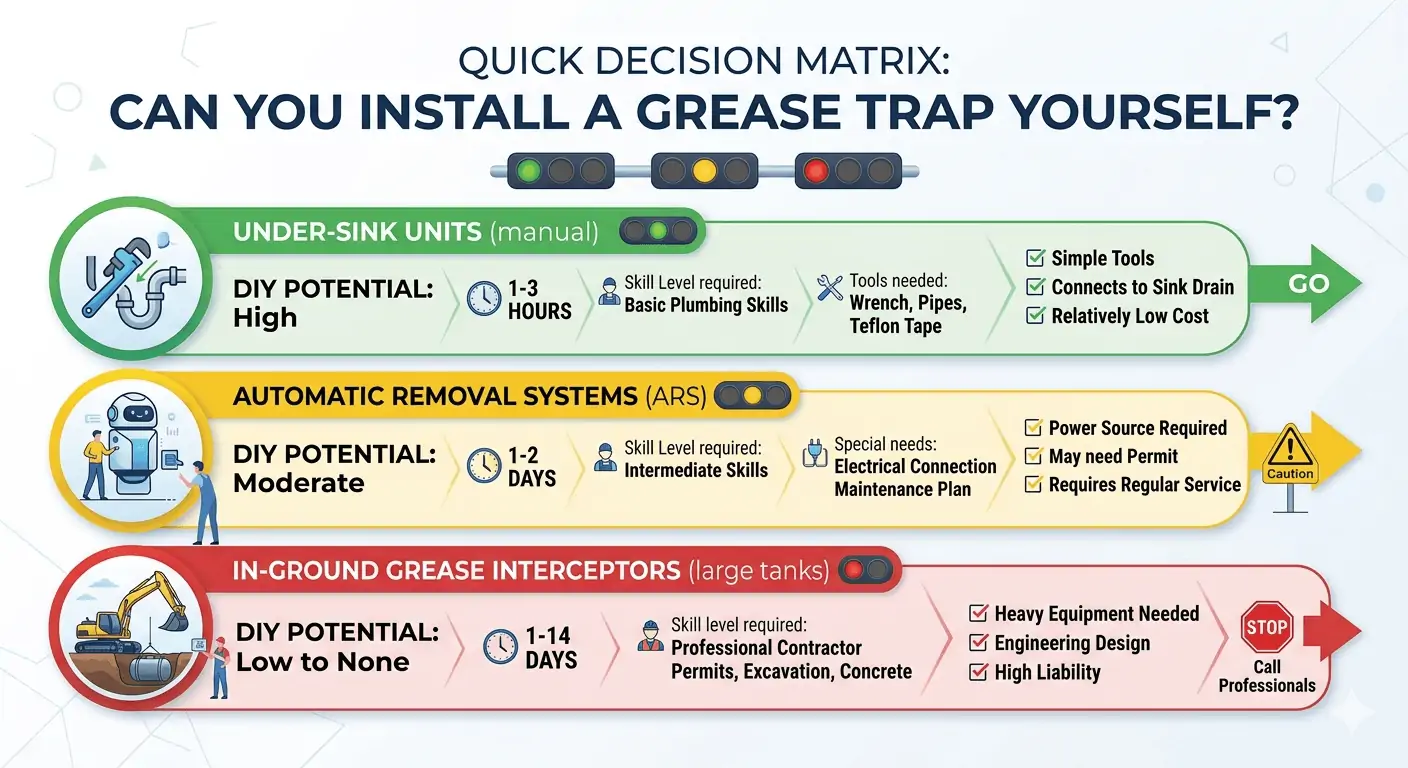
Most small "under-sink" units are manageable if you're handy with a wrench. But once you move to high-capacity systems, the game changes. Here is the reality of what we see in the field:
| Feature | DIY Installation (Under-Sink) | Professional Installation (In-Ground) |
|---|---|---|
| The Job | Basic plumbing connections. | Excavation, heavy lifting, and concrete work. |
| Your Time | 1-3 hours if you have the parts [1]. | 1 to 14 days depending on the system [2]. |
| The Cost | Around $200 for the unit and parts. | $1,500+ for labor, permits, and equipment. |
| Red Tape | Usually none for simple swaps. | Mandatory permits in almost every city. |
| Risk | Moderate (Leaky seals or bad smells). | Low (The work is insured and bonded) |
If we are talking about a small hydromechanical unit under a prep sink, follow this sequence:
Compliance isn't a "one and done" task. To keep the city off your back, we recommend following these two critical standards:
We've seen business owners try to save a few hundred dollars by skipping maintenance or hiring unlicensed installers, only to get hit with bills that could have bought a new delivery van.
If you're installing a small unit under a prep sink, take your time and check your seals twice. But if you're looking at an exterior tank or a complex automatic system, call a professional. The cost of a permit and a licensed plumber is nothing compared to the cost of a city-mandated shutdown during your busiest season.
Your kitchen is the heart of your business. Don't let a preventable plumbing failure stop the pulse. We've seen too many great Miami restaurants lose a week of revenue over a "simple" DIY mistake that turned into a flooded dining room. If you have any doubts about your current setup or the local codes in your neighborhood, let's talk. Our experience is your insurance policy.
[1] Industry Standard: Typical under-sink installation timelines.
[2] Municipal Building Codes: Standard excavation and permit windows for interceptors.
[3] EPA: FOG Regulatory Limits and Best Practices.
[4] Local Administrative Code: Environmental Violation Fine Schedules.
[5] Clean Water Act Guidelines: Penalties for waterway pollution.
[6] Insurance Industry Data: Premium impacts following commercial water damage claims.
[7] FOG Program Exemptions: Small business criteria for grease management.

 Verified by Carlos Rivera